
Since I was a kid i’ve been using a knife. I thought that I had complete knowledge of a kitchen blade & full confidence in wielding them. But, since knives were the clear starting line for my kitchen education I started researching them. It wasn’t until then that I realized just how deep the knife rabbit hole could go.
People go crazy for kitchen knives. It’s truly a hobby for some and a topic that people spend a lifetime exploring (especially in the world of hand-crafted Japanese knives). There are countless websites & forums dedicated to discussing types of steels, showing off rare knives, sharpening practices and, of course, countless arguments about what makes for a good or bad blade. If you want to get into the weeds, there are tons of resources – but do not fret, you can learn everything needed to cook the most delicious meals with just some basic knife knowledge. I broke my research down into 2 parts; technique and equipment – the yin & yang of kitchen prep. Today, I’ll go over the techniques I learned to wield a chef’s knife with maximum control & stay safe while chopping any ingredient. Here is my overview – with only the essentials so that your mental counter space doesn’t get too crowded (and your kitchen doesn’t either).
Technique
Knowing how to handle a kitchen knife correctly is the single most important thing in a kitchen. Improper technique can leave you with a fingertip missing, dripping blood in your salad. Luckily, the technique is simple & straightforward, and although it can take years of practice to perfect, it will keep you safe from any sharp mishaps & give you beautifully even cuts.
The first thing to learn is how to hold a knife – without a sturdy grip you cannot have full control of your blade. The universally accepted method to properly secure your blade is to use the Pinch grip. Start by approaching your knife’s handle as if you were shaking a hand. Wrap your pinky, ring and middle finger around the base of the handle, and pinch the actual steel between your thumb and pointer. At first, there is definitely a feeling of unease brought on when holding the actual knife part of the knife. But, the pinch ensures that the movement of the blade matches the movement of your wrist, giving you full control & ensuring that you always know which direction the edge is facing. Just holding the handle gives the knife an opportunity to shift around in your palm – a situation where chaos can arise. A helpful analogy that I heard while studying, is to think about how much less control you have writing your name if you were to grip the very end of a pen, rather than close to the point. The same is true with your knife.


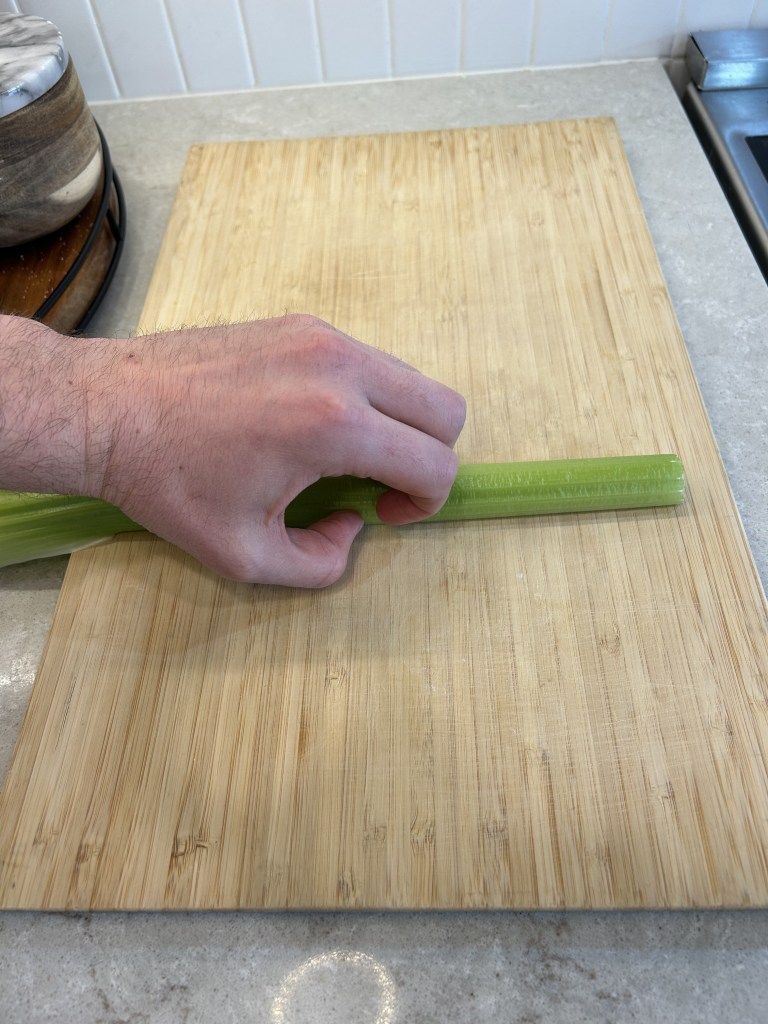
So what do I do with the other hand? Claw it up! The claw grip creates a barrier between your finger tips & the edge, protecting you from any injury. Curl your fingers inward, facing the point created by your knuckles outward. With the tops of your finger nails you can secure the item you’re cutting, and use your knuckles as a guide for the knife. When you go to make a slice, the claw grip allows you to feel the steel of the knife against your knuckle, thus you can be certain that your fingertips cannot physically be below the edge of the knife. Much like the pinch grip, the claw certainly feels wrong at first but after some conscious practice it has become second nature to me & made me entirely confident that I wont slice anything off.

After learning Pinch & Claw, the next step is to actually cut what you need to cut. There are two types of cuts to learn, the Rolling Cut & the High Cut. These cuts can both be used for handling most ingredients, and people typically have a preferred cut based on feel. But each can have advantages depending on the type of item being sliced, and the type of knife you are using (stay tuned for the write up on equipment!). With both of these motions an overarching theme exists – always cutting horizontally through an item, rather than just up & down. Pushing forward, or pulling backwards, makes much easier & cleaner cuts, as the knife is able to slice instead of wedge through an item. Imagine a piece of paper going straight into your skin – it does nothing, but a slicing motion from a piece of paper can make the strongest of men yelp.
The Rolling Cut can best be described as a gliding low cut. Keeping the tip of the knife down on your board, you allow the curve of the knife to do the work, melting forward through the food in one smooth motion. Once you feel the way the knife works in a methodical & rhythmic manner, it is easy to find a pace with it. Maybe im weird (I am), but I feel like the knife moves like a dolphin jumping in out of the water. Thus, I call this the dolphin cut.
The High Cut can also be called a “push” or “pull” cut – and is exactly what it sounds like – you’re either pushing the knife forward or pulling it back to make your slice. For a push cut, you angle the knife downward slightly and slide it forward & down through whatever you’re cutting. For a pull cut, you tilt it back a bit and drag it back & down toward you. I personally find it much more difficult to hit a rhythm with these cuts, but once mastered they can be used to make incredibly fast work of an item while creating razor thin slices.
To practice these skills I have been approaching all my food prep with intention, working on form to help create even cuts safely, and then working on slowly increasing my speed. I found it helpful to make dishes that involve lots of vegetable prep, but also are not hindered by uneven or non-uniform cuts. Chicken Noodle Soup checks all those boxes, since everything just gets boiled anyway. I made a jerk chicken variation yesterday, stay tuned!
It is clear that it takes years & years to be a master, but with just a little bit of practice anyone can get these techniques down. Since prep is a part of every recipe, getting nice with your knife will make every single future recipe easier, better & safer.
Let me know if you have any thoughts or advice!
-Gil


Leave a comment